

🧠 Build a Local RAG Chatbot with LangChain, Ollama, and Chroma
- Techno Billion AI
- Apr 9, 2025
- 2 min read

In today’s AI-powered world, LLMs (Large Language Models) like GPT, LLaMA, or Mistral can generate human-like responses—but they often forget facts or can’t access your private data. That’s where RAG (Retrieval-Augmented Generation) comes in: it combines the creativity of LLMs with the accuracy of your own data sources, like PDFs, websites, or CSVs. Think of it as giving your AI a brain and a library. Using tools like LangChain for chaining logic, Chroma for vector storage, and Ollama for running models locally, you can build powerful chatbots that are smart, private, and fully offline. No cloud. Just pure, local AI magic.
In this post, we’ll walk through how to build a local retrieval-augmented generation (RAG) chatbot using:
🦜 LangChain for orchestration
🐙 Ollama with LLaMA3.2 for local language model inference
🧠 ChromaDB for vector search
📁 Your own Q&A knowledge stored in a simple CSV file
⚙️ Embedding with mxbai-embed-large
Whether you’re just getting started with LangChain or you want to run AI locally without sending anything to the cloud, this step-by-step guide is for you.
The chatbot is designed to answer questions based on your custom CSV data — perfect for:
Internal knowledge bases
Offline assistants
Personal tools that protect data privacy
Quick AI-powered lookups from structured documents
🏗️ Architecture

🧰 Requirements
Make sure you have:
Python 3.11+
Conda
Ollama installed locally
VS Code or any IDE
Your CSV file (x.csv) with columns: Question, Answer
⚙️ Environment Setup with Conda
1. Install Miniconda (if not installed)
Download Miniconda
Check it's installed:
conda --version2. Create and activate the environment
conda create --name myqnaenv python=3.11
conda activate myqnaenv
3. Add your requirements.txt
langchain
langchain-ollama
langchain-chroma
langchain-core
pandas
Then install:
pip install -r requirements.txt🗂️ Folder Structure
my-rag-app/
├── main.py
├── vector.py
├── x.csv
├── requirements.txt
└── README.md
🧑💻 Step-by-Step Code Implementation
✅ Step 1: Main Chatbot Script (main.py)

✅ Step 1: CSV to Vector Store (vector.py)

🧪 Run the App
Make sure x.csv is in your folder, and then just:
python main.py Try asking things like:
Question: What is the capital of France?✅ You Did It!
You're now running a local, private, and extendable RAG chatbot using open-source tools and your own data. No cloud, no limits, just local power.
🌟 What’s Next?
Here are a few ideas to level it up:
🔁 Add streaming outputs (like ChatGPT)
🖼️ Build a web UI with Gradio or Streamlit
🗂️ Load data from multiple files, not just CSV
🧠 Try different LLMs with Ollama (e.g. gemma, mistral, etc.)
With just a few Python scripts and open-source tools, you've built a fully local RAG-powered chatbot that understands your custom data and responds intelligently—without ever sending a single byte to the cloud. You've explored how LangChain simplifies orchestration, how Ollama lets you run powerful LLMs like LLaMA3.2 locally, and how Chroma stores and retrieves knowledge from your CSV. This is just the beginning. You now have a flexible foundation to build smarter, more secure AI tools tailored to your needs—whether that’s internal documentation search, private research assistants, or domain-specific copilots.
Ready to take it further? Try adding a web UI, plug in different models, or scale to multiple data sources. The tools are in your hands. Happy building! 💡🚀
1
Searing the Beef
Sear beef fillets on high heat for 2 minutes per side to form a golden crust. Let it cool before proceeding to keep the beef tender.
1
Searing the Beef
Sear beef fillets on high heat for 2 minutes per side to form a golden crust. Let it cool before proceeding to keep the beef tender.
1
Searing the Beef
Sear beef fillets on high heat for 2 minutes per side to form a golden crust. Let it cool before proceeding to keep the beef tender.
1
Searing the Beef
Sear beef fillets on high heat for 2 minutes per side to form a golden crust. Let it cool before proceeding to keep the beef tender.
Notes


1
Season the good fresh beef fillets with salt and black pepper. Heat olive oil in a pan over high heat and sear the fillets for 2 minutes per side until it fully browned. Remove the beef from the pan and brush with a thin layer of mustard. Let it cool.
1
Season the good fresh beef fillets with salt and black pepper. Heat olive oil in a pan over high heat and sear the fillets for 2 minutes per side until it fully browned. Remove the beef from the pan and brush with a thin layer of mustard. Let it cool.
1
Season the good fresh beef fillets with salt and black pepper. Heat olive oil in a pan over high heat and sear the fillets for 2 minutes per side until it fully browned. Remove the beef from the pan and brush with a thin layer of mustard. Let it cool.
1
Season the good fresh beef fillets with salt and black pepper. Heat olive oil in a pan over high heat and sear the fillets for 2 minutes per side until it fully browned. Remove the beef from the pan and brush with a thin layer of mustard. Let it cool.
Instructions
Quality Fresh 2 beef fillets ( approximately 14 ounces each )
Quality Fresh 2 beef fillets ( approximately 14 ounces each )
Quality Fresh 2 beef fillets ( approximately 14 ounces each )
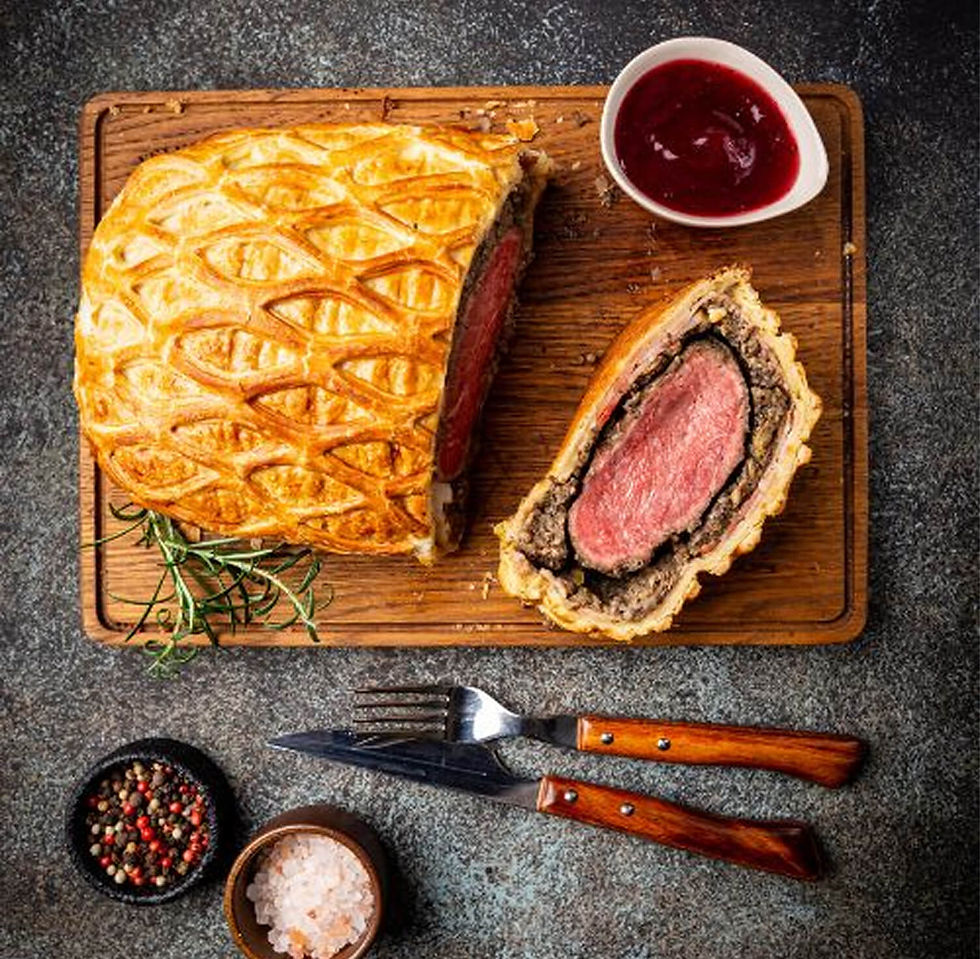
Beef Wellington
Beef Wellington
Fusion Wizard - Rooftop Eatery in Tokyo
Author Name
%20(1).jpg)
Beef Wellington is a luxurious dish featuring tender beef fillet coated with a flavorful mushroom duxelles and wrapped in a golden, flaky puff pastry. Perfect for special occasions, this recipe combines rich flavors and impressive presentation, making it the ultimate centerpiece for any celebration.
Servings :
4 Servings
Calories:
813 calories / Serve
Prep Time
30 mins
Prep Time
30 mins
Prep Time
30 mins
Prep Time
30 mins


Comments